Introduction
Opening your WordPress dashboard for the first time can feel like stepping into a cockpit, buttons, menus, and options everywhere. You might be wondering where to begin, what to click, and how to make your website look the way you imagined.
If that sounds like you, take a deep breath, you’re not alone. Every new WordPress user, whether in the U.S., U.K., or anywhere else in the world, starts right where you are now: curious, excited, and a little overwhelmed.
This guide is built to take away that confusion. It’s a complete, beginner-friendly walkthrough of the WordPress Dashboard, written in plain, easy-to-understand language. You’ll learn what each section does, how to customize your site’s design, publish your first pages and posts, and install essential plugins without any guesswork.
By the time you finish reading, you’ll not only know your way around WordPress — you’ll feel confident managing and growing your website like a pro.
What is the WordPress Dashboard?

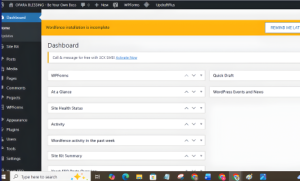
The WordPress Dashboard is the main control center of your website. Once you log into WordPress, the dashboard is the page you see first. It is where you manage your website’s content, design, plugins, users, security, and general settings. You can think of it as your website’s “home base” where every feature can be accessed and controlled.
You can always return to the dashboard by clicking the Dashboard tab on the left menu.
Whenever you want to log in from any device, use this link:
Log in with your username and password, and you are in.
The Dashboard Home Screen
The Dashboard Home Screen gives you a quick overview of your website. It contains helpful panels that show website activity, statistics, and shortcuts.
Here are the common sections and what they mean:
| Section | Description |
|---|---|
| At a Glance | Shows how many pages, posts, and comments your website currently has. |
| Activity | Displays recent posts, comments, and site updates. |
| Site Health | Tells you if your website is running well or needs maintenance. |
| Quick Draft | A simple box to quickly save ideas for a future blog post. |
Recommended Action
To avoid confusion, remove items you do not need on the screen.
Click Screen Options (top right) and uncheck sections you are not using.
This keeps your dashboard clean and simple.
Understanding the Left Sidebar Menu

The left-side menu is the main navigation for your dashboard. Every feature of your website is found here. We will go through each one in detail so you understand exactly what it does.
1. Posts
This section is used for publishing blog posts. Inside this tab, you will find:
-
All Posts – View and manage every post you’ve written.
-
Add New – Write a new blog post.
-
Categories – Organize your posts into topic groups.
-
Tags – Add extra descriptive labels for better search visibility.
If your website will have a blog, this section is very important.
2. Media
The Media Library stores all images, videos, logos, and files uploaded to your website.
To upload a file:
Always use clear image names. For example, instead of “image001.jpg,” use “web-design-service.jpg.”
This improves SEO.
3. Pages
Pages are used for content that does not change often. Examples include:
-
Home
-
About
-
Contact
-
Services
-
Portfolio
-
Privacy Policy
To create one:
Key Difference:
Posts change regularly. Pages remain long-term.
4. Comments
If your website allows comments, you will manage them here. You can approve, delete, or reply to comments. If you want to avoid spam, disable comments in Settings.
5. Appearance
This is where you control how your website looks.
Inside Appearance, you have:
| Option | Use |
|---|---|
| Themes | Choose or change the overall design. |
| Customize | Edit your logo, colors, layout, header, and footer. |
| Menus | Create navigation menus like “Home, About, Contact.” |
| Widgets | Add content blocks to sidebars or footers. |
If you want flexible drag-and-drop website design, install Elementor or Blocksy theme.
6. Plugins
Plugins add features to your website. They work like apps on a phone.
Popular and helpful plugins used globally include:
| Plugin | What It Does |
|---|---|
| Yoast SEO | Helps your website rank on Google. |
| WPForms | Lets you easily add contact forms. |
| UpdraftPlus | Backs up your website. |
| WooCommerce | Enables e-commerce stores. |
| Smush | Compresses images for faster speed. |
To install a plugin:
Do not install too many plugins. They can slow your website down.
7. Users
If more than one person is working on your site, this section allows you to:
-
Create accounts
-
Assign roles
-
Control permissions
Roles include:
| Role | Description |
|---|---|
| Administrator | Full access to everything. |
| Editor | Can edit all content but cannot change settings. |
| Author | Can write and manage their own posts. |
| Subscriber | Can only read and comment. |
Only give Administrator access to people you fully trust.
8. Tools
This section is mostly for importing and exporting data. Beginners rarely need it, but it becomes useful when moving to a new hosting provider.
9. Settings
This is a very important section because it controls how your website works.
| Setting | What You Can Control |
|---|---|
| General | Site title, tagline, time zone |
| Writing | Default formatting options |
| Reading | Choose homepage and blog page layouts |
| Discussion | Comment rules |
| Media | Image settings |
| Permalinks | URL structure |
Make sure to set Permalinks to “Post Name” for better SEO.
How to Create Your First Page
Follow these steps:
-
Go to Pages → Add New
-
Enter your page title, for example: “About Us”
-
Write your content in simple paragraphs
-
Add images if needed
-
Click Publish
Your page is now live.
How to Create Your First Blog Post
-
Go to Posts → Add New
-
Write your title
-
Type your article in the content editor
-
Add images to support your writing
-
Select a category to organize the post
-
Click Publish
Your blog post is now visible to visitors.
Recommended Plugins for Beginners (U.S., U.K., and Global)
The following plugins are widely used and trusted:
| Plugin | Purpose |
|---|---|
| Yoast SEO | Helps improve your website ranking. |
| WPForms | Allows contact form creation. |
| Smush | Reduces image sizes for faster speed. |
| Wordfence | Adds security protection. |
| WooCommerce | Enables online store features. |
Install only what you need. Simplicity keeps your website fast.
Security and Website Maintenance Tips
-
Keep WordPress, themes, and plugins updated.
-
Use strong passwords.
-
Install a security plugin like Wordfence.
-
Perform regular backups with UpdraftPlus.
-
Delete unused plugins and themes.
These steps protect your website from attacks and errors.
Internal Links and How to Use Them Correctly
Internal links help your readers move from one helpful topic to another inside your website. They also help search engines understand your content better and improve your ranking.
Here is how to use them:
When you mention something you already wrote about, link to it naturally in the sentence. For example:
If you have a post on creating a website without coding, link to it like this:
If you are starting from scratch, read our guide on how to create a website without coding to learn the foundation before customizing your dashboard.
Internal links should feel natural, helpful, and relevant. Avoid placing them randomly without context.
Conclusion
The WordPress Dashboard may look complex at first, but once you understand where everything is and what each menu controls, the process becomes easy. With the knowledge you have now, you can create pages and posts, manage your design, install helpful plugins, and maintain your site confidently.
Read this next:
How to Create a Website Without Coding (Continue learning and building your website.)
You can also subscribe, comment, or share this guide to help others who are learning.
You are now in control of your website.
Keep practicing. You will get better with every click.
Go to Screen Options in the upper-right corner to hide widgets you don’t need. You can also install plugins like Adminimize to further personalize the look and features of your dashboard.
Go to Users → Add New in your dashboard. Enter their email and assign a role such as Administrator, Editor, or Author based on what access level they need.
The first step is to familiarize yourself with the sidebar menu. From there, you can set your site title under Settings → General, choose a theme under Appearance → Themes, and start creating your first pages or posts.
Go to Appearance → Customize. This section allows you to change your logo, colors, fonts, header, and layout in real time. If you want more design flexibility, install a visual builder like Elementor. How can I customize my WordPress Dashboard?
How do I add new users to my website?
What should I do first after logging into my WordPress Dashboard?
How do I customize my website’s appearance from the Dashboard?

